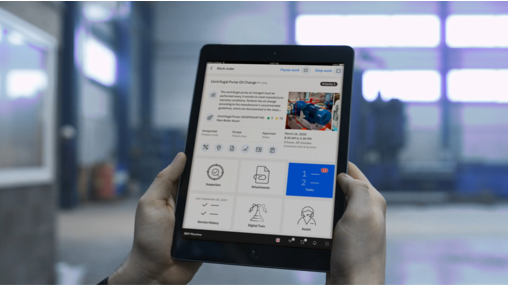
At the recent Maximo User Group, I did a presentation on external sensors and automation. For my presentation, I created a demo science lab containing a photo and temperature sensitive incubator. My science lab is in New Zealand and may therefore be subject to earthquakes! Additionally, my incubator must be kept in controlled heat and light conditions. Lastly, once my incubator has been setup by a scientist, a specialist hazard removal crew must come in and clean the lab, dispose of hazardous material and sterilize the lab.
My demo science lab consists of a metal frame which is the structure of the building. This also uniquely doubles up as a frame to rest my phone on so that my phone can act as a web cam displaying the incubator on a projector screen for the viewers. The incubator is an Arduino uno module with a push button, photo sensor, heat sensor and motion sensor. Additionally, I added an indicator LED to the Arduino, which was programmed to turn on in the event that a sensor is triggered. In doing so, myself and my viewers could see when the button is pressed, when the lighting conditions changed, when the temperature rises or when an earthquake is occurring.
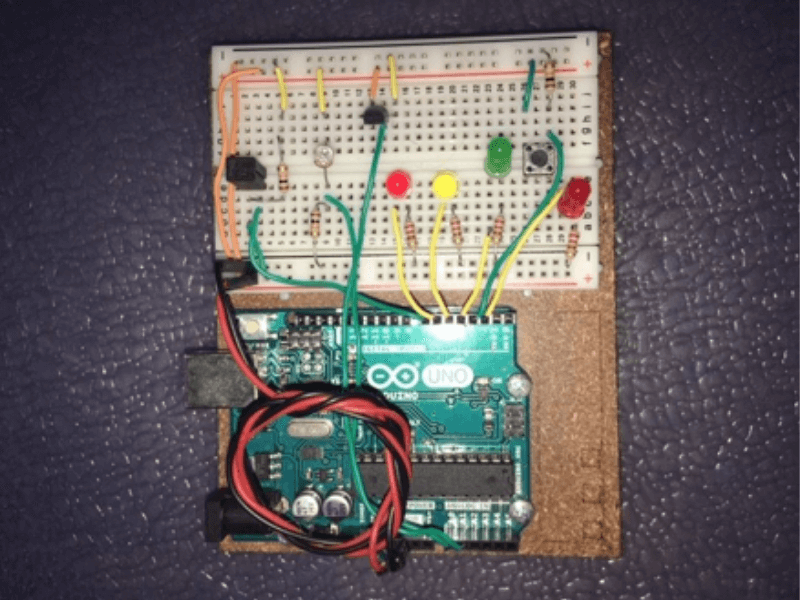
~ Demo science lab ~
I’ve programmed the Arduino to be configurable with certain base line values such as room temperature and room light conditions. This was particularly handy as I wasn’t sure of the temperature and light conditions in the presentation room. Once in the presentation room, I measured the baseline values and set them in the Arduino code before I presented my demo.
It’s worth noting that I didn’t have time to organize a Wi-Fi shield for my Arduino so for the purposes of the demo I wrote serial commands from the Arduino to the USB connection of my computer as my sensors were triggered. A python script on my computer was picking up the serial output from the comm port and based on the serial output, it would issue a web service call to our demo Maximo environment. I used the out-of-the-box object structure end points and from an integration point of view no changes were made to Maximo. From a Maximo data point of view, I created the following: asset (incubator), location (science lab), job plans and meter (continuous meter attached the location).
Demo part 1:
Scenario 1: Let’s say the team of scientists are setting up the incubator and once they are done, they want to alert the specialized cleaning crew to come in and clean the lab, dispose of the hazardous materials and sterilize the lab and equipment. Once the scientists are done setting up the experiment, they will trigger the push button which will in turn create a Work Order in Maximo. The scientist is no longer required to login to Maximo or spend any time entering data. Note the red sensor alert LED is on which indicates the push button is pressed.
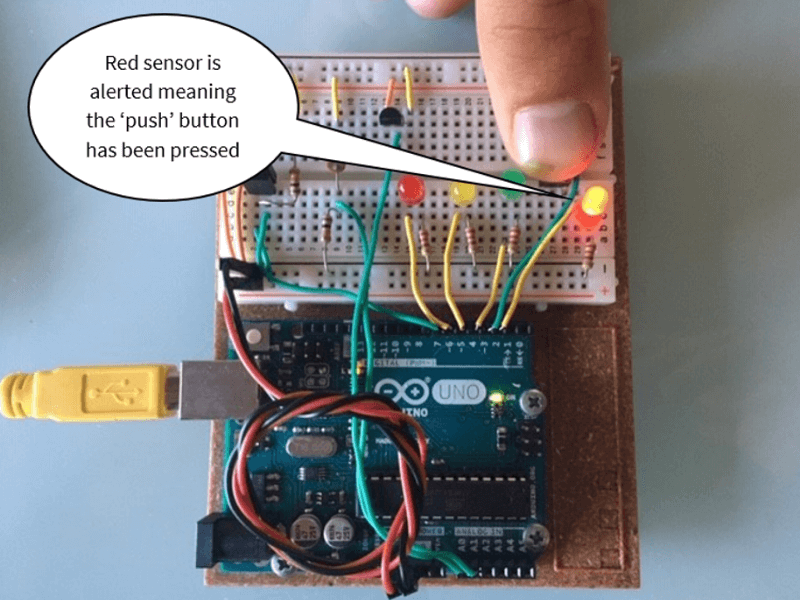
~ Red light indicates that ‘push’ button has been pressed to create a Work Order in Maximo ~
Below is the resulting Work Order:
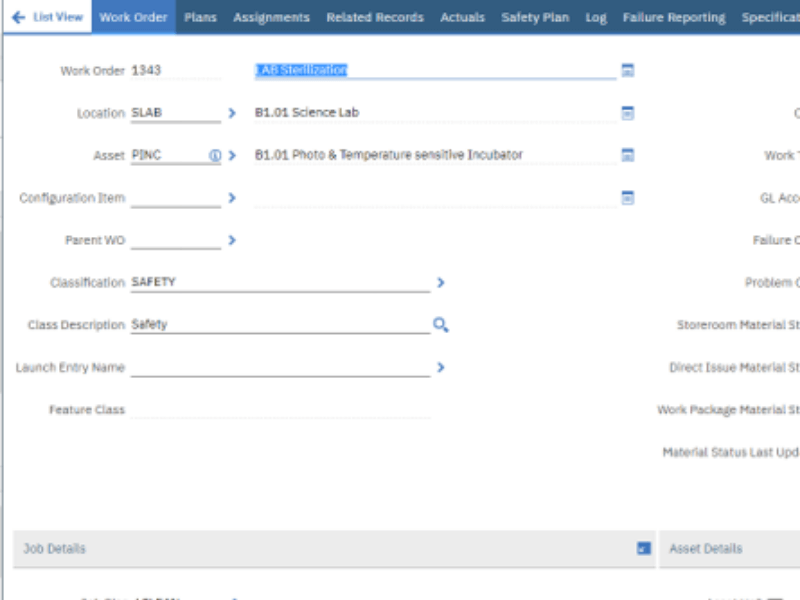
~ Work Order ~
Scenario 2: The incubator is located in a lab which is part of a larger building. As this building may be subject to earthquakes, it is vital for us to track the number of earthquakes occurring because after every 10 earthquakes, a structural engineer is required to inspect the structural integrity of the building. To achieve this, I’ve equipped the Arduino with a motion sensor and this will pick up any simulated earthquakes or shaking of the unit. Every quake will increase the continuous meter count associated to the location in Maximo and at 10 quakes a Work Order will be generated for the engineer, notifying them of a building check. For the purposes of the demo I had the python code keep track of the earthquake count but typically in real life the PM module would be responsible for that. Using the PM module wasn’t suitable for demo purposes because of time constraints.
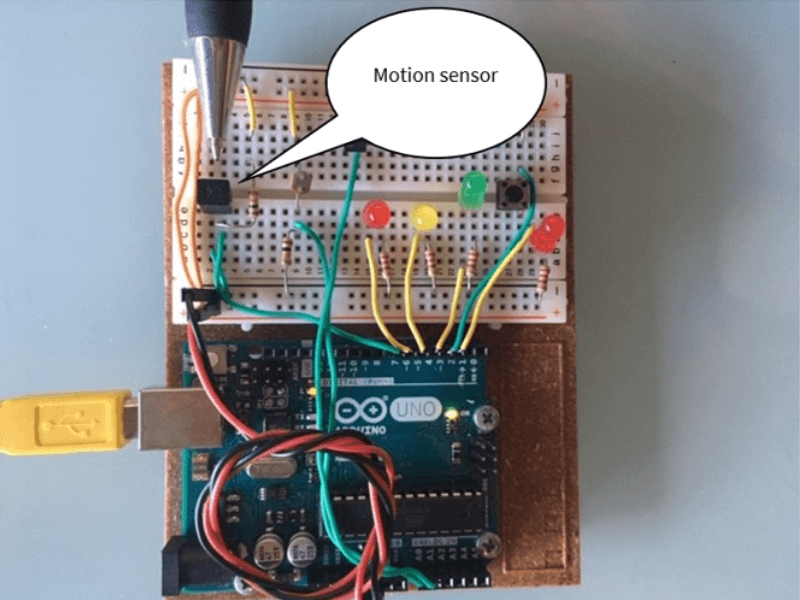
~ Motion sensor detects earthquakes ~
Below are the meter details and the resulting Work Order:
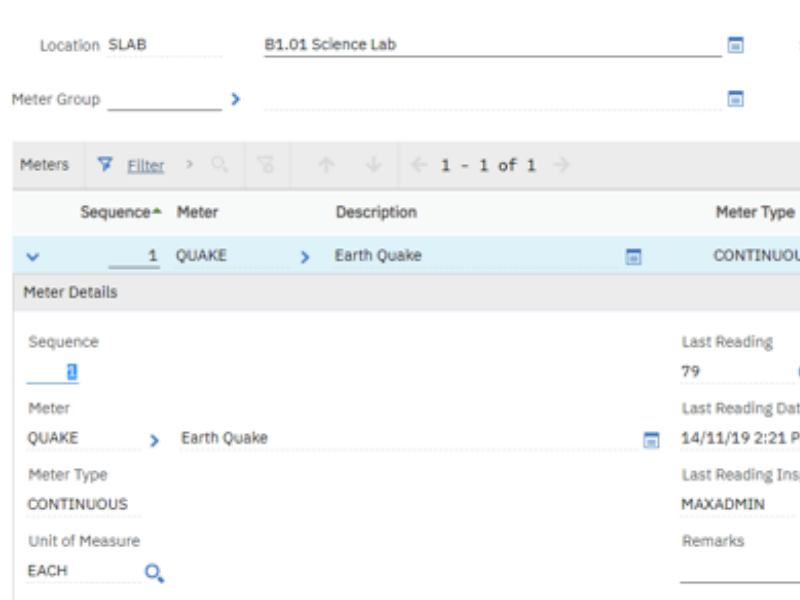
~ Meter details ~
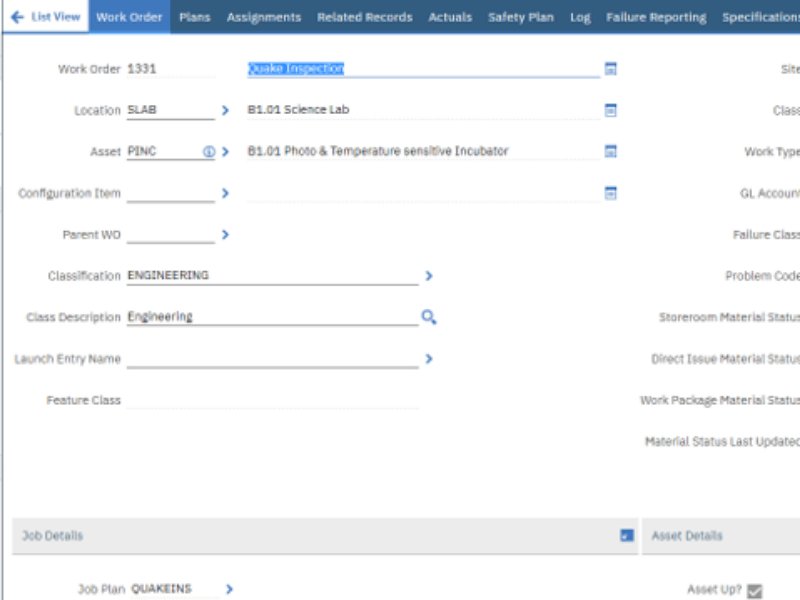
~ Work Order ~
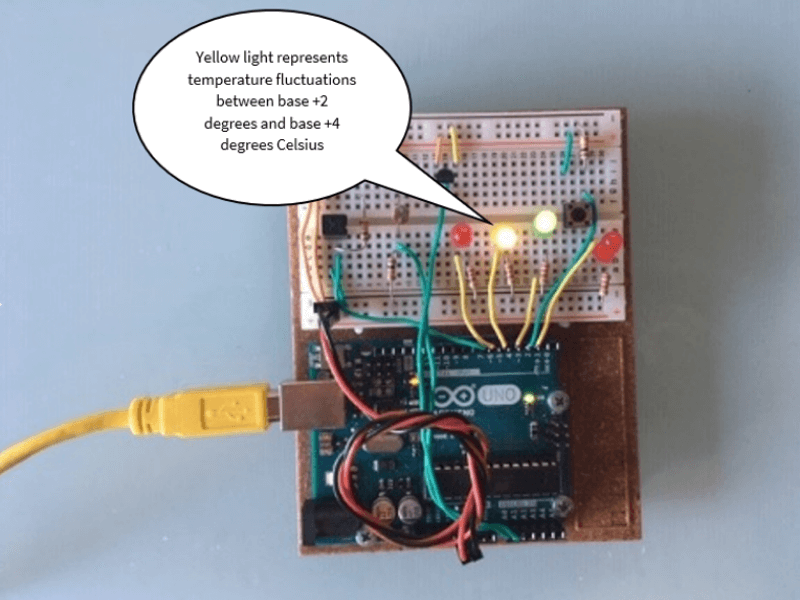
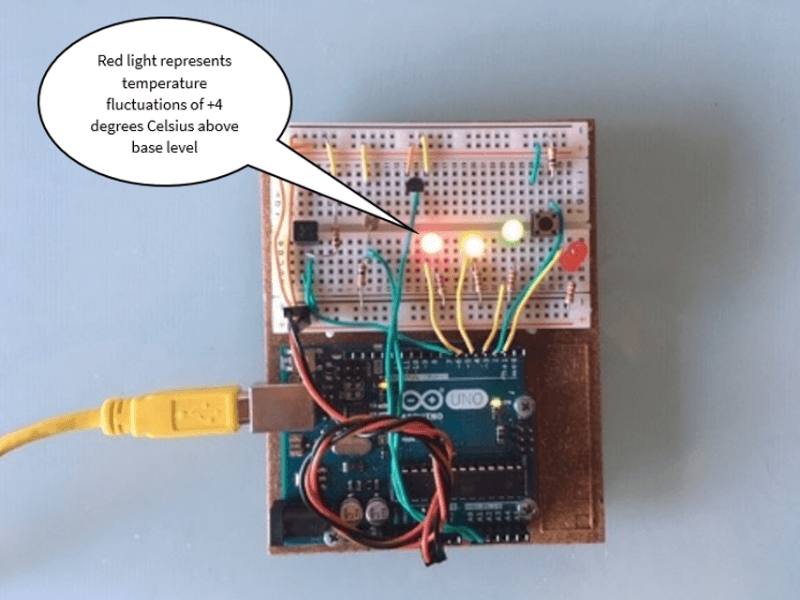
Scenario 3: For this example, I’ve used 3 LEDs on the Arduino. The green alert LED represents temperature fluctuations between base temperature and base + 2 degrees Celsius.
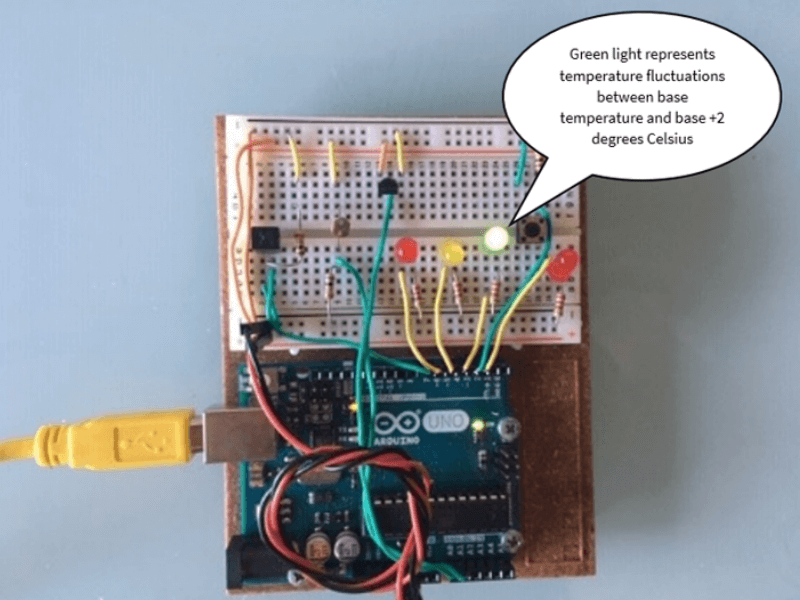
~ Temperature fluctuations ~
If the temperature fluctuation is between base + 2 degrees and base + 4 degrees Celsius, the yellow warning LED will light up along with the green alert LED.
~ Temperature fluctuations ~
If the temperature goes above base + 4 degrees Celsius, all three LEDs will light up. This allowed myself and my viewers to see what temperature deviation we were experiencing. Below are the 3 temperature deviations we catered for.
~ Temperature fluctuations ~
When cleaners and engineers enter the lab, the opening of doors and switching on of lights may alter the light and temperature conditions of the lab. It is therefore normal for the lab to expect certain deviations from the defined conditions. For example, during an inspection, the structural engineer may have to open a couple of doors or windows. This often leads to an increase of temperature by between 0 and 2 degrees Celsius. In that case we raise a priority to SR. The reviewer of the SR will then have a look to see if there are any open Work Orders for inspecting the structural integrity of the building and if so, they can dismiss the SR. However, the air conditioning has malfunctioned in the past, causing a significant rise in temperature – although this rise was relatively slow. In this case, if the temperature is between 2 and 4 degrees Celsius above our defined base temperature, we raise a P1 SR. If the temperature rises 4 degrees above the base temperature, we can create a P1 Work Order straight away. Below is the created SRs and Work Orders.

~ Service request ~

~ Work Order ~
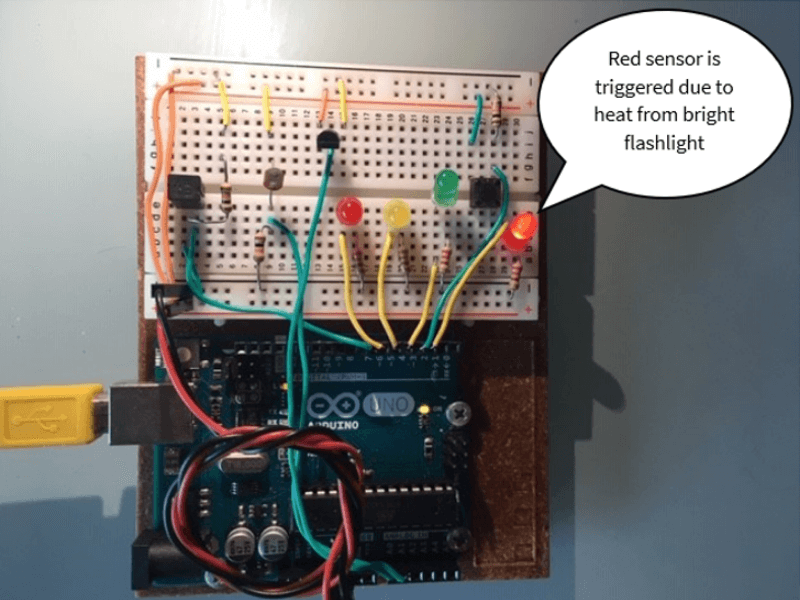
Scenario 4: Light sensors will be triggered when cleaners or structural engineers open doors to the lab or switch lights on. However, if they forget to close the doors, this can lead to prolonged exposure of bright lights and may often cause the heat sensor to be tripped. For my demo, exceeding the base line light conditions by a set margin created an investigative Work Order in Maximo. Below I shined a flashlight onto the Arduino, note the red sensor alert LED on the right is on which indicates the light sensor is triggered.
~ Light and heat sensors will trigger when cleaners and structural engineers are in the lab ~

~ Work Order ~
Demo part 2
For the second part of my demo I changed the coding of the Arduino to react intelligently to its sensors. When a light sensor is activated (meaning the lab door is being opened), we can expect a temperature fluctuation with that and, if the temperature remains within 2 degrees Celsius of our base line temperature this causes no risk to our scientific experiments. If we have a temperature alert (variation between base and base + 2 degrees Celsius) and the light sensor is tripped, we do not have to create a P2 SR for the temperature alert. However, if the temperature rises to an alert level without the photo sensor being tripped it creates a P2 SR as per normal.
To sum up…
There are two concepts that I wanted to illustrate through my demo. Firstly, I wanted to highlight that automation and intelligent decision making can be utilized to better increase the success rates of assets in the field. Secondly, automation and intelligent decision making can also reduce labour hours on manually having to monitor asset conditions or entering data into a system. Our lab was configured to accept certain alerts without acting on them – this was demonstrated in part 2 of the demo. This in turn frees up the SR reviewer to spend their time more productively on reviewing other SR’s.
To illustrate the power of this I mentioned two real world examples.
- In 1979, General motors made $11 billion in revenue with a work force of 800 000 employees. This equates to about 14 000 in revenue per employee. In 2012 Google made $14 billion in revenue with only 58 000 employees. This equates to about $2 million in revenue per employee. Granted that factors such as inflation and the fact that they are massively different industries would have also impacted on their revenue generation.
- In 2004, at its peak, Block Buster’s made $6 billion in revenue with a work force of 84 000 employees, about $72 000 revenue per employee. However, Netflix made $9 billion with just 4500 employees which is also in the region of $2 million revenue per employee.
Other examples where automation and intelligent decision making has proven to be very successful is Facebook, Uber & AirBnB. At this stage it is worth noting that not all or in fact any of our clients are big tech giants such as these, but it is the principal that proves the rule. To remain competitive in the modern market we must maximize the productivity of our workforce by giving tasks to machines so that the employee can spend more time on tasks that the machine can’t (yet) do.
Why not have a chat to BPD Zenith about Asset Health Monitoring?